티스토리 뷰
GridLayout은 2차원 격자무늬 형태의 레이아웃으로 행과 열의 집합형태로 구성된 레이아웃입니다. TableLayout의 단점을 보완한 레이아웃으로 LinearLayout 또는 FrameLayout과 같은 다른 레이아웃의 장점을 포함하는 레이아웃입니다. GridLayout을 사용할 시 다른 레이아웃과 중첩으로 사용할 필요가 없어 메모리 사용량을 줄일 수 있다는 장점이 있습니다.
1. GridLayout 속성 - orientation / rowCount / columnCount
| 속성 | 설명 |
| orientation |
자식 뷰(View)들이 GridLayout의 각 셀 영역에 배치되는 방향을 결정합니다. orientation = "horizontal" : 수평방향으로 뷰(View)를 정렬합니다. orientation = "vertical" : 수직방향으로 뷰(View)를 정렬합니다. |
| rowCount | GridLayout의 행의 개수를 지정합니다. |
| columnCount | GridLayout의 열의 개수를 지정합니다. |

▼ GridLayout 속성 rowCount와 columnCount를 통해 2x3 형태의 격자 무늬를 가지는 GridLayout입니다. 왼쪽은 app:orientation = "horizontal" 지정함으로써 자식 뷰(View)들을 수평 방향으로 배치하고 있습니다. 오른쪽은 app:orientation = "vertival"을 통해 자식 뷰(View)들을 수직 방향으로 배치하는 것을 확인할 수 있습니다.
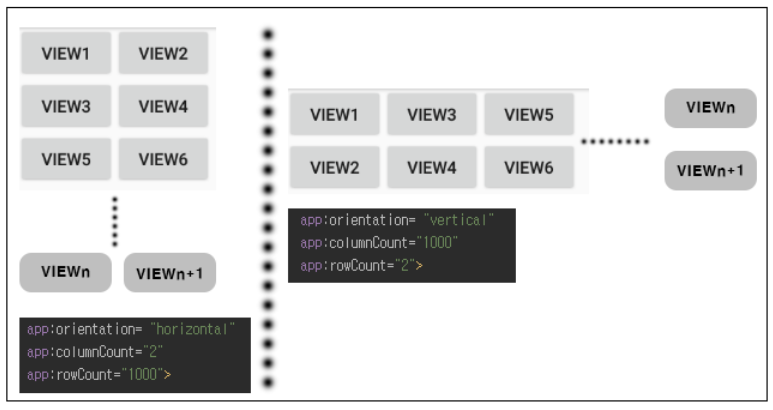
▼ GridLayout은 자식 뷰(View)를 추가하면 행 또는 열이 계속해서 추가가 되는 레이아웃입니다. app:orientation = "horizontal" 일 때 columnCount 속성을 통해 열의 개수를 조절하면 됩니다. 지정한 열만큼 자식 뷰(View)가 추가되고 그 뒤로는 새로운 행에 배치가 되는 것이죠. 즉 app:orientation = "horizontal" 일 경우는 rowCount의 속성값은 의미가 없습니다.
2. GridLayout 속성 - alignmentMode
alignmentMode 속성은 자식 뷰(View)들을 정렬할 때 기준이 되는 뷰(View)의 여백을 포함하여 나머지 뷰(View)들을 정렬할지를 결정하는 속성입니다. 이때 기준이 되는 뷰(View)란 가장 큰 너비 혹은 높이를 가지는 뷰(View)를 의미합니다.

▼ 기준이 되는 뷰(View)는 View2가 됩니다. alignmentMode 속성값에 따라 나머지 뷰(View)들이 어떤 식으로 정렬되는지 확인해보세요.
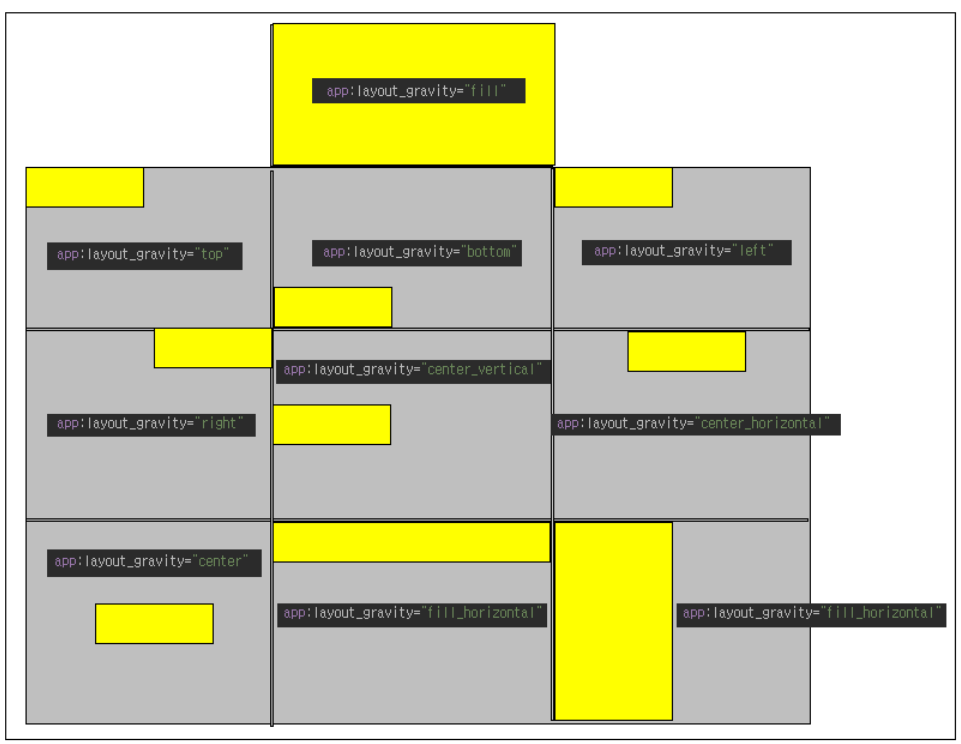
3. layout_gravity
layout_gravity 속성은 다른 레이아웃 공부를 하면서 익숙하게 봤던 속성입니다. GridLayout의 자식 뷰(View)들이 가지는 속성인 layout_gravity 속성을 통해 해당 자식 뷰(View)가 셀의 어느 위치에 배치될지를 결정할 수 있습니다. 속성값별로 배치되는 영역은 아래를 참조 바랍니다.
| 속성값 | 설명 |
| layout_gravity = "top" | 셀의 상단에 배치 |
| layout_gravity = "bottom" | 셀의 하단에 배치 |
| layout_gravity = "left" | 셀의 좌측에 배치 |
| layout_gravity = "right" | 셀의 우측에 배치 |
| layout_gravity = "center_vertical" | 수직으로 중앙에 배치 |
| layout_gravity = "center_horizontal" | 수평으로 중앙에 배치 |
| layout_gravity = "center" | 셀의 정중앙에 배치 |
| layout_gravity = "fill_horizontal" | 셀에 배치되는 뷰(View)의 너비를 셀의 너비에 맞춤 |
| layout_gravity = "fill_vertical" | 셀에 배치되는 뷰(View)의 높이를 셀의 높이에 맞춤 |
| layout_gravity = "fill" | 셀의 전체 크기에 맞게끔 뷰(View)의 크기를 맞춤 |
4. layout_row / layout_column
GridLayout에 배치되는 자식 뷰(View)를 특정 행과열의 위치를 지정할 수 있습니다.

▼ 왼쪽은 3x2 GridLayout을 배치하고 뷰(View)3개를 수평으로 배치한 형태입니다. 오른쪽은 같은 레이아웃 형태에서 View2의 위치를 app:layout_column = "0" 과 app:layout_row = "1"의 형태로 지정하고 있습니다. 주의할 점은 View2 다음에 배치되는 View3입니다. View3의 경우 앞에 배치된 View2에 이어서 orientaion 속성값에 따라 수평으로 배치된다는 점입니다.
5. layout_columnspam / layout_rowspan
layout_columnspan과 layout_rowspan은 지정한 값만큼 셀의 행과 열을 합치는 속성입니다. 이번 건은 실제 예제를 통해 살펴보겠습니다.
<?xml version="1.0" encoding="utf-8"?>
<android.support.constraint.ConstraintLayout xmlns:android="http://schemas.android.com/apk/res/android"
    xmlns:app="http://schemas.android.com/apk/res-auto"
    xmlns:tools="http://schemas.android.com/tools"
    android:layout_width="match_parent"
    android:layout_height="match_parent"
    tools:context=".MainActivity">

    <android.support.v7.widget.GridLayout
        android:layout_width="wrap_content"
        android:layout_height="wrap_content"
        app:orientation= "horizontal"
        app:columnCount="3"
        app:rowCount="2"
    >

        <Button
            android:id="@+id/View1"
            android:layout_width="wrap_content"
            android:layout_height="wrap_content"
            android:text="View1"
            app:layout_columnSpan="2"
            app:layout_gravity="fill"
            />

        <Button
            android:id="@+id/View2"
            android:layout_width="wrap_content"
            android:layout_height="wrap_content"
            android:text="VIEW2" />

        <Button
            android:id="@+id/button11"
            android:layout_width="wrap_content"
            android:layout_height="wrap_content"
            android:text="VIEW3" />

        <Button
            android:id="@+id/button12"
            android:layout_width="wrap_content"
            android:layout_height="wrap_content"
            android:text="VIEW4" />

        <Button
            android:id="@+id/button13"
            android:layout_width="wrap_content"
            android:layout_height="wrap_content"
            android:text="VIEW5" />

    </android.support.v7.widget.GridLayout>
</android.support.constraint.ConstraintLayout>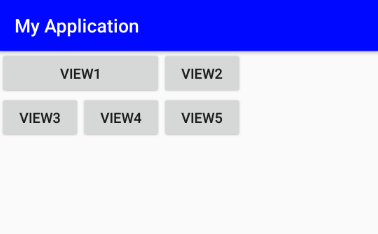
▼ 3x2 GridLayout을 배치하고 그 아래 뷰(View) 다섯 개를 배치한 형태입니다. 첫 번째 뷰인 VIEW1의 layout_columnspan = "2" 를 지정함으로써 열 두 개를 병합하도록 하였습니다. 결과화면에서 VIEW1이 셀 2개를 병합한 형태로 배치되는 것을 확인할 수 있습니다. 다음은 row_span입니다.
<?xml version="1.0" encoding="utf-8"?>
<android.support.constraint.ConstraintLayout xmlns:android="http://schemas.android.com/apk/res/android"
    xmlns:app="http://schemas.android.com/apk/res-auto"
    xmlns:tools="http://schemas.android.com/tools"
    android:layout_width="match_parent"
    android:layout_height="match_parent"
    tools:context=".MainActivity">

    <android.support.v7.widget.GridLayout
        android:layout_width="wrap_content"
        android:layout_height="wrap_content"
        app:orientation= "horizontal"
        app:columnCount="3"
        app:rowCount="2"
    >

        <Button
            android:id="@+id/View1"
            android:layout_width="wrap_content"
            android:layout_height="wrap_content"
            android:text="View1"
            app:layout_rowSpan="2"
            app:layout_gravity="fill"
            />

        <Button
            android:id="@+id/View2"
            android:layout_width="wrap_content"
            android:layout_height="wrap_content"
            android:text="VIEW2" />

        <Button
            android:id="@+id/button11"
            android:layout_width="wrap_content"
            android:layout_height="wrap_content"
            android:text="VIEW3" />

        <Button
            android:id="@+id/button12"
            android:layout_width="wrap_content"
            android:layout_height="wrap_content"
            android:text="VIEW4" />

        <Button
            android:id="@+id/button13"
            android:layout_width="wrap_content"
            android:layout_height="wrap_content"
            android:text="VIEW5" />

    </android.support.v7.widget.GridLayout>
</android.support.constraint.ConstraintLayout>
▼ 위 예제 레이아웃 형태에서 VIEW1의 layout_rowspan = "2"를 지정하였습니다.
'Programming > Android 개발' 카테고리의 다른 글
| [Android] 안드로이드 - 익명 클래스(Anonymous Class) 사용법 (0) | 2019.05.05 |
|---|---|
| [Android] 안드로이드 - 에디트텍스트(EditText) 사용법 정리 (1) | 2019.05.04 |
| [Android] 안드로이드 - 어플리케이션 4대 구성요소 (Component) (0) | 2019.05.01 |
| [Android] 안드로이드 - 프레임레이아웃 (FrameLayout) (0) | 2019.04.30 |
| [Android] 안드로이드 - 랠러티브 레이아웃(Relative Layout) (0) | 2019.04.29 |